1. Install MetaMask
Identified by its fox logo that follows your cursor across the screen, MetaMask is a household name in the crypto community. Many crypto and NFT fans have been using the wallet since its inception in 2017.
MetaMask is a software cryptocurrency wallet that interacts with the Ethereum blockchain. With it, users can access their Ethereum wallet using a browser extension or mobile app, which can be used to interact with decentralized applications. It has multiple use cases, like storing cryptocurrencies such as ETH, ERC-20 tokens like Enjin and even NFTs like Axies. MetaMask can even be used to swap tokens inside the application itself.
Below are the steps you can use to set up your own MetaMask wallet.
Downloading the app for your Browser:
In order to create a wallet, you need to first install the extension. Most browsers support MetaMask (MM), including Chrome, Brave and Firefox.
We will be demonstrating how to set up your wallet via Chrome. These steps should be replicable across all other browsers.
Unfortunately in this industry, scammy apps will pretend to be legitimate. I recommend going straight to the MetaMask website to avoid any potential fake versions.
Once here, you can continue through to the Chrome webstore. The MetaMask website will redirect you to where you need to go. Once you've arrived at the webstore, click the blue “Add to Chrome” button.

Then you’ll click “add extension”.
Creating your account:
Now that you've got the extension added to your browser, it's time to head to MetaMask and create an account.
Click on the extension icon in your Chrome browser; the extension icon is located in the top right hand corner on Chrome and should be in a similar location on other browsers.
Once MetaMask is open, you may be prompted to either "Create a Wallet" or "Import wallet." If you are first setting up your MetaMask account, select the former. If you have a wallet already, you can select "Import wallet" and then you will be asked to input your 12 word seed phrase to link your account; we'll tackle the seed phrase below.

Once you've opted to create a new account, you will be asked to accept the terms of use, and then prompted to create a new password. Click Create.
IMPORTANT:
When MetaMask reveals your secret words, DO NOT FORGET to write them down.
This section is bolded so that you don't accidentally skim and lose access to your wallet forever.
Click the "Reveal Secret Words" button.
You will see a 12 words seed phrase.
DO NOT store these online, as that can always be a potential security risk. Instead, write these down in a notebook or something you will not misplace. Store it somewhere safe.

Now you'll need to verify your secret phrase. Again, if you lose it, no one can help you recover the secret phrase, so it's very important that you have it well-documented. Verify the phrase by selecting the previously generated phrase in order.
How to set up MetaMask on mobile:
The process of setting up your wallet on mobile is almost entirely the same as the desktop method. Instead of needing to download an extension for your browser, you simply need to go to either the App Store or the Google Play store and download MetaMask.
Again, the most important part of the process is documenting your seed phrase so that you can get into your account from other devices.
Identifying your wallet address:
Now your MetaMask wallet is set up. What's next?
You can use your wallet to house your NFTs and other tokens, but the unique (and public) wallet address associated with your account also allows other users to send you different kinds of tokens directly to your wallet.

Your address is easy to identify; both the mobile and desktop version have a button right next to the code that you can use to copy it to your clipboard. Remember to paste it somewhere else (notepad, message, etc), the wallet is 40 characters long and does not contain an ellipsis, what MetaMask shows is simply a way to abbreviate long text.
2. Add Polygon Mainnet to your wallet
Adding Polygon support to your wallet involves adding some network details to the extension. First, open MetaMask and click the network dropdown menu.

Now, click [Add Network] on the pop-up.

You’ll need to add the following details on the [Add a network] page that will open. Click [Save] when you’re finished.
|
Network Name |
Polygon |
|
New RPC URL |
Choose any of the following: |
|
Chain ID |
137 |
|
Currency Symbol |
MATIC |
|
Block Explorer URL |
https://polygonscan.com/ |
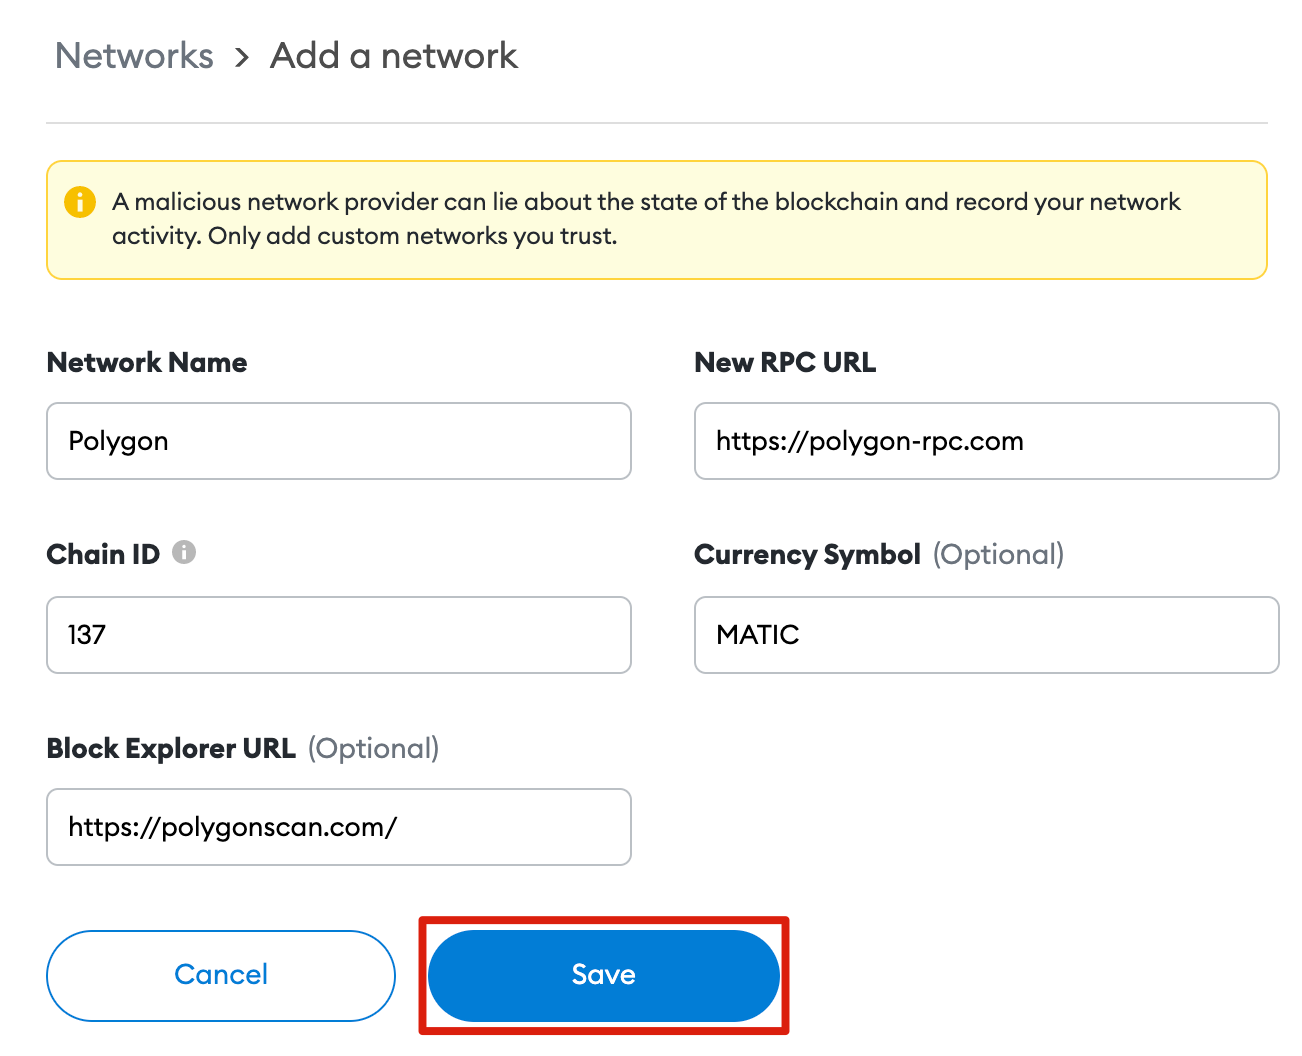
You’ll now successfully be connected to the Polygon network.
3. Include NetU21 Token
Once you have the Polygon network installed in your wallet, you can add a new token, using the "Import token" link.
The data to configure NetU21 Coin are:
Smart Contract: 0xf988C3984124685Fcc665dB21E83aD2E988309aD
Symbol: NETU21
Decimals: 8
If you are using your wallet directly on your browser, you can set NetU21 Coin with the following buttons: